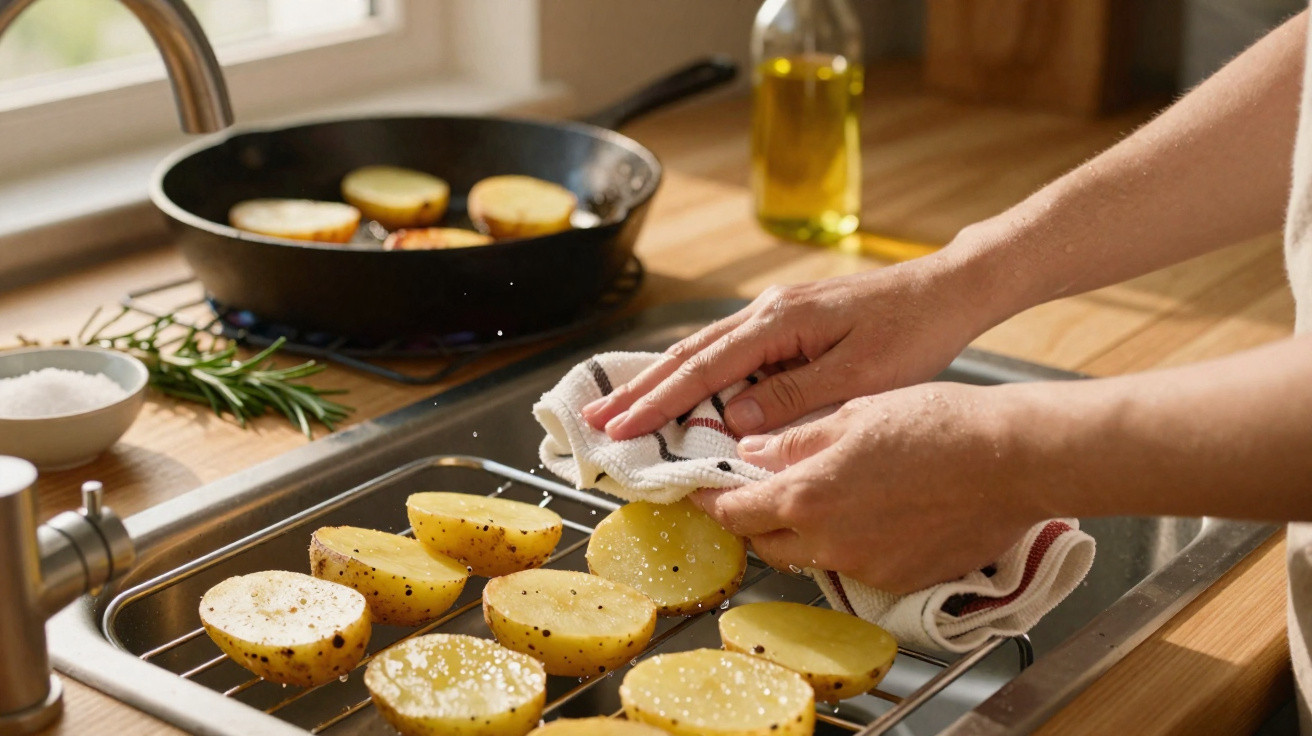
A simple step at the kitchen sink can mean the difference between failure and food-porn-worthy results.
Many home cooks know the feeling: you have followed the recipe, the frying pan is hot and the butter is foaming – yet the plate still ends up holding pale, limp fried potatoes. The hope of a crisp, golden-brown crust collapses into a soggy compromise. What may seem like a lack of skill is usually down to one overlooked action, long before any heat is involved.
Why fried potatoes stay soft in the frying pan
If you simply peel, dice and tip potatoes straight into the pan, you are creating the problem from the outset: there is too much moisture and starch on their surface. Both prevent a crisp crust from forming.
Still-damp pieces carry water into the hot fat. As it evaporates, that water creates a kind of steam cushion around the cubes, stopping the surface from properly browning. Rather than roasted flavours, you get pale, lightly steamed pieces that stick together and break apart easily.
“Wet potatoes cook in the frying pan – dry potatoes fry and turn crisp.”
There is also plenty of starch on the outside. It acts like glue, causing the pieces to cling together, tear apart when turned and fail to develop an even browned layer. If you then keep adding more in a hurry and overcrowd the pan, the result is more likely to be a partly broken-up potato pan than crisp fried potatoes.
Another frequently missed factor is the tuber’s internal structure. In a potato, pectin holds the cells together like natural brickwork. If this “cellular concrete” remains too firm at the surface, it browns less effectively and feels chewy rather than crunchy, even with butter and oil. With unsuitable varieties in particular, the texture can quickly become dry or floury.
The one step before the frying pan that changes everything
The key distinction between soggy and crisp fried potatoes is made not on the hob, but at the tap. It comes down to three stages: rinse, soak, dry.
Preparing potatoes correctly
This is how to create the foundation for a perfect crust:
- Peel the potatoes, or scrub them thoroughly if you want to leave the skins on.
- Cut them into evenly sized cubes or slices measuring around 1.5 to 2 centimetres.
- Place the pieces in a large bowl of cold water.
- Stir them vigorously with your hand to release the starch.
- Drain the water and keep refilling with fresh, cold water until it remains clear.
Every change of water removes some of the starch that would otherwise create the characteristic sticky coating. The result is potatoes that fry more freely, stick less and develop a much better crust.
Drying matters more than butter
After soaking comes the step many people skip for convenience – and which costs them their crisp crust every time: thorough drying.
Spread the drained pieces over a clean tea towel or kitchen paper. Pat every side dry until the surface looks genuinely matt. If water is still beading or glistening, the pan will not be able to perform at its best.
“Get them into the frying pan as dry as possible – that is half the battle for real crunch.”
This is the moment that determines whether the fat can fry the potatoes or whether another layer of steam will form and block the heat.
The right potato variety and fat
Even with flawless preparation, the wrong potato can undo everything. Varieties with a firm texture are far better suited to frying than floury potatoes.
Which potatoes turn crisp – and which do not
- Suitable (waxy): for example, Charlotte, Amandine, Laura and Annabelle
- Suitable to a limited extent (fairly waxy): these work, but crumble more quickly
- Less suitable (floury): they break apart easily and soon feel dry when eaten
Waxy varieties hold their shape even when their exterior is deeply browned. This creates a pleasing contrast: crisp outside and soft inside, without becoming too floury.
When choosing fat, it is worth considering the smoke point. Refined vegetable oils, such as rapeseed, sunflower or groundnut oil, withstand high temperatures better than butter on its own. If you enjoy the flavour of butter, add it later, once the potatoes have already taken on colour.
How to fry potatoes in a pan for maximum crunch
The remaining factors are heat, patience and space working together.
- Choose a large frying pan, ideally cast iron or heavy stainless steel.
- Add oil and heat it thoroughly until it starts to shimmer slightly.
- Put the dry potato pieces in as a single layer – fry them in two batches if necessary.
- Leave them undisturbed at first. Do not stir for several minutes.
- Once the underside is well browned, turn the pieces carefully.
- Reduce the heat slightly and allow the centres to finish cooking through.
- Add seasonings such as garlic, onion, thyme or rosemary only towards the end so they do not burn.
“Do not keep stirring – the potato needs contact with the frying pan to form a crust.”
Overfilling the pan creates a steam bath. The temperature drops sharply, condensation builds up and the contents braise instead of fry. It is better to cook two smaller batches one after the other and gain genuine roasted flavours.
Oven trick: extra-crisp fried potatoes with a kitchen staple
For anyone who enjoys an especially robust crust, it is worth taking a short detour via a saucepan and the oven. Professional kitchens have long relied on one helpful ingredient: bicarbonate of soda from the cupboard.
Preparing oven-fried potatoes
Here is how the method works:
- Cut the potatoes into pieces and soak them briefly as described above.
- Bring water to the boil in a saucepan.
- Add around three tablespoons of bicarbonate of soda to the boiling water.
- Parboil the potatoes in it for about ten minutes.
- Drain them, allow them to steam dry briefly, then shake them vigorously in a bowl with a little melted butter or oil.
- Spread the roughened pieces over a baking tray, leaving plenty of space between them.
- Bake at around 220°C conventional heat for about 20 minutes, turning them once midway through.
The bicarbonate of soda causes the pectin structure at the surface to break down slightly. This makes the outer layer rougher and creates more small corners and edges – ideal points for heat and browning to work on. It is precisely the texture that later gives such a satisfying crunch.
What can still go wrong – and how to prevent it
Even with all these tricks, a few familiar kitchen pitfalls remain. Keeping them in mind will take you to “golden-brown and crisp” much more often than “grey and soggy”:
- Heat that is too low: the fat must not merely be lukewarm. A properly preheated frying pan is essential.
- Salting too early: heavy salting very early draws additional water out of the potato. It is better to salt once the crust has started to form.
- Too much moisture in the seasoning: add fresh herbs only at the end; otherwise, they will burn or soften the surface again.
- Impatience when turning: turn the pieces only once the underside is truly brown. A hesitant attempt too soon tears open the crust again.
Anyone who cooks this way more often will soon develop a sense of what the perfect surface looks like: slightly deep golden, no longer shiny and more dry-looking. When nudged with a fork, it should feel faintly crackly rather than simply resistant.
Storage also has an interesting effect. Older potatoes that have been stored for a long time often contain more sugar. They brown faster, but can also become dark and bitter more easily. Fresher tubers sometimes need a little more time, but provide a more even colour in return.
With these details in mind, a frustrating traybake or pan dish becomes a genuine highlight that works not only alongside steak and a fried egg, but also as a meal in its own right with herby quark or a quick salad. Once you have tasted the difference between “simply fried” and “properly prepared”, you will not forget to turn on the tap before reaching for the frying pan again.









Comments
No comments yet. Be the first to comment!
Leave a Comment