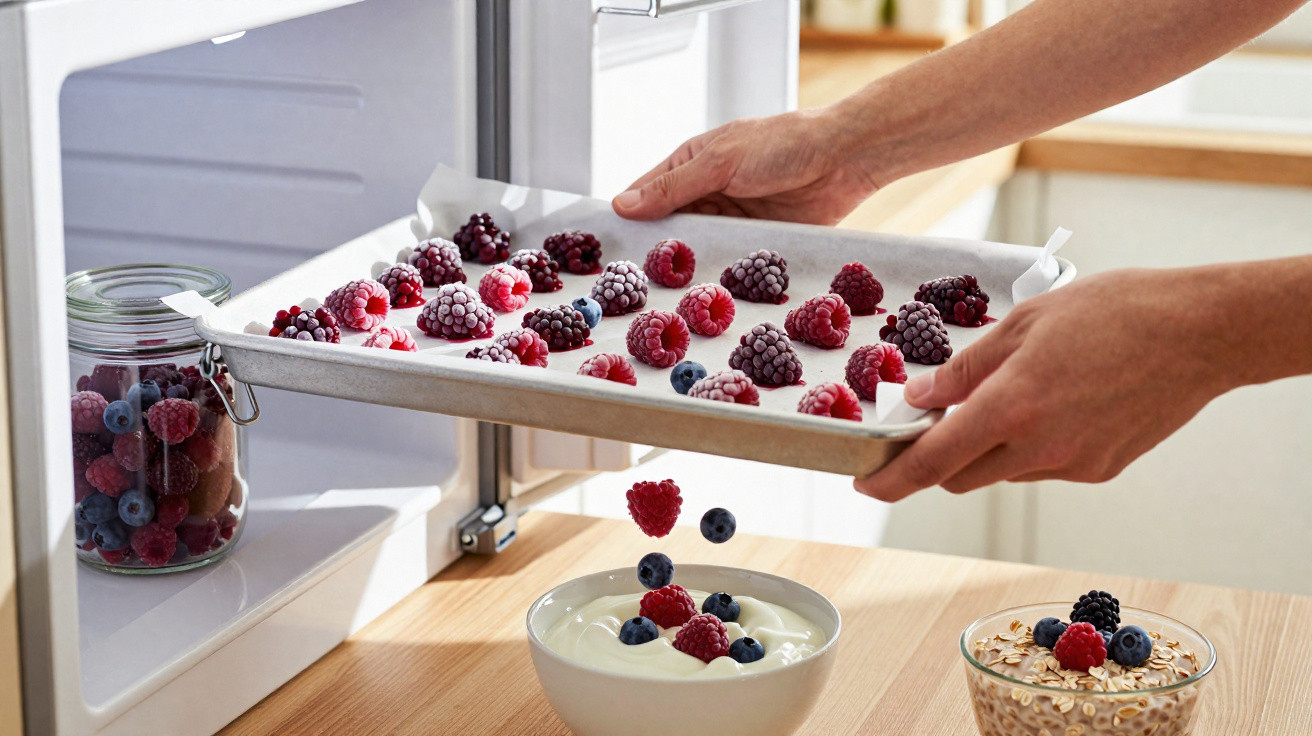
The metal tray lands on the worktop with a muted clunk.
You open the freezer, rather pleased with the pile of fresh berries you picked up on offer. A day later, you reach in for “a handful” and find one solid, ice-covered block of fruit fused together. You attack it with a spoon, try the side of a knife, scatter frozen berry fragments across the kitchen, and end up with a smoothie flavoured with slight disappointment.
Freezing berries ought to be one of the simplest ways to save money and eat more healthily. Yet it regularly becomes a small household struggle involving plastic bags, frost and purple-stained fingers. Somehow, between Pinterest and the shelf in your actual freezer, the plan falls apart.
There is, however, one tiny, almost effortless freezer technique that solves the problem. Try it once and you will not want to return to the old way.
Why frozen berries turn into a sticky block
Look inside almost any freezer and the picture is familiar: partly open bags of berries tucked beneath ice cream and peas, with frost crystals spreading over everything. Inside each bag, the fruit has joined into an uneven lump that cannot be portioned without force. At that stage, you do not really have berries any longer; you have a fruit iceberg.
The cause is straightforward, if irritating. Natural juice on the berries’ surfaces freezes, softens slightly whenever the freezer door is opened, then freezes again into one shared coating. One berry attaches to the next, and then another, until the entire bag becomes a single frozen mass. You wanted a handful. You got a fossil.
On a Tuesday morning, when all you need is a speedy smoothie, that minor inconvenience can be enough to make you leave the fruit alone. Your good intention disappears with it.
At an Oregon farm, a berry grower once showed me how berries should look when frozen properly. He opened a vast industrial freezer, pulled out a tray and lifted a stream of raspberries that tumbled like marbles. There were no clusters or fragments, only individual, flawless berries rolling over his hand. When I told him about the solid berry blocks in my home freezer, he laughed.
His solution was not specialist magic equipment but a process: freeze every berry separately and quickly before putting them in a bag. In industry, this is known as IQF, or Individually Quick Frozen. At home, it is less impressive-looking: just a tray, room in the freezer and a little patience. But it offers the same freedom: you can pour the fruit out instead of chiselling at it.
He said that his family freezes more than 50 kilos of berries every summer, then eats them in February as though they had been picked the day before. That is not simply a recipe; it is a lifestyle choice.
Once you understand the physics, it becomes impossible to ignore. Berries are delicate, water-rich and thin-skinned. If they are piled together as they freeze, surface moisture acts as an adhesive. Put them in a bag while they are still soft and damp, and they will naturally form clusters as they freeze from the outside towards the centre.
Give every berry space instead, and the outcome changes. Cold air reaches every side simultaneously, the outside freezes quickly and the juice remains contained. Each berry holds its form, with no shared sticky coating to bind it to the others. In effect, you have created a tiny frozen “shell” around every berry.
That is the entire trick: the method of freezing matters more than the length of time in the freezer. Treat berries as separate little individuals and your freezer will stop working against you.
The frozen berries tray trick that changes everything
The method is simple: before berries go anywhere near a bag, put them on a tray. Any flat baking sheet or metal tray will do. Line it with baking parchment or a silicone mat to prevent sticking, then arrange the berries in one layer with a little room between them, like small red and blue planets against a cold metal sky.
Place the tray in the coldest area of the freezer, then leave it alone. After two to four hours, the berries should be as hard as pebbles. At that point, quickly move them into a freezer bag or airtight container. Give the container a gentle shake and listen for the quiet, satisfying rattle of loose berries. That noise is frozen convenience.
You have now reproduced the IQF approach at home, without buying equipment, creating fuss or spending much additional time.
This is where everyday life intervenes. You arrive home with three punnets of blueberries and a box of strawberries that were “too good a deal to leave.” They have already begun to soften on the worktop. In an ideal world, you would wash, dry, prepare and tray-freeze them that evening. Let’s be honest: nobody really does that every day.
Instead, adapt the process. Rinse the berries carefully, then lay them over a clean tea towel or kitchen paper. Allow them to dry fully, because moisture is the enemy here. Hull strawberries and slice them if that suits you. Then work in manageable batches: one tray tonight, another tomorrow, and one while the coffee is brewing. During a busy week, that is far more achievable than one enormous “freezer project”.
The only genuinely problematic step is trying to hurry it. If berries are put into a bag while even slightly soft or damp, clumping returns. They do not need to be perfect; they simply need to be completely solid before spending the long freeze together.
“The first time my berries didn’t freeze into one giant lump, I actually opened the bag just to pour them back and forth,” laughs Emma, 34, who batch-preps smoothie kits on Sunday nights. “It sounds silly, but that little rattle made me feel like I finally had my life together, at least in the freezer department.”
What may sound like a specialised kitchen tip soon becomes a small everyday victory. Open the bag and tip precisely seven raspberries over yoghurt, add three strawberries to your child’s snack bowl, or stir a handful of blueberries into pancake batter. There is no need to defrost a full bag, chip away at ice or throw fruit away. Suddenly, you are someone who uses the fruit they buy, rather than discovering a sad frosty block in April.
- Tray-freezing berries once provides ready-to-use fruit for months.
- Individual berries make portion control easier and reduce food waste.
- The texture remains closer to fresh, particularly for baking and toppings.
Making frozen berries an everyday luxury
Something changes when your freezer stops being a resting place for forgotten fruit and begins to act like a small treasure chest. Loose berries become an understated luxury that you forget you made yourself. You wake up, scatter a handful over breakfast, and it feels unexpectedly generous, even when you are standing in the kitchen wearing old joggers.
Most of us have had the moment after a doctor’s appointment or an exhausting week when we promise to “eat more fruit”. Then life resumes. The berries shrivel in the fridge drawer, guilt sets in, and they end up in the bin. One tray and a few hours in the freezer can change that story: you save the fruit before it declines, and your future self silently appreciates it.
This is not about becoming an intensely organised meal-prep expert. It is about taking away one small obstacle between you and a better habit. Separate, non-sticky berries mean adding fruit takes two seconds rather than ten. On a rushed weekday, that can be the difference between doing it and deciding it is not worth the effort.
| Key point | Details | Why it matters to readers |
|---|---|---|
| Dry berries thoroughly before freezing | After rinsing, pat berries dry and leave them to air-dry for 10–20 minutes on a clean towel. Excess water on the surface freezes into ice that binds the berries together. | Thorough drying produces fewer clumps, less freezer burn and berries that retain their shape rather than becoming icy mush. |
| Use a single layer on a tray | Line a baking sheet with baking parchment and spread the berries so that they are not touching. Freeze for 2–4 hours until completely hard, then move them into bags or containers. | This easy step copies professionally “individually frozen” berries, allowing you to pour out precisely the amount required whenever you need it. |
| Choose the right container and freezer position | Keep frozen berries in sturdy freezer bags or rigid airtight tubs. Store them away from the door, where temperatures vary most. | Consistent cold and secure packaging preserve flavour and texture for months, saving money and preventing those disappointing frosty mystery bags. |












Comments
No comments yet. Be the first to comment!
Leave a Comment