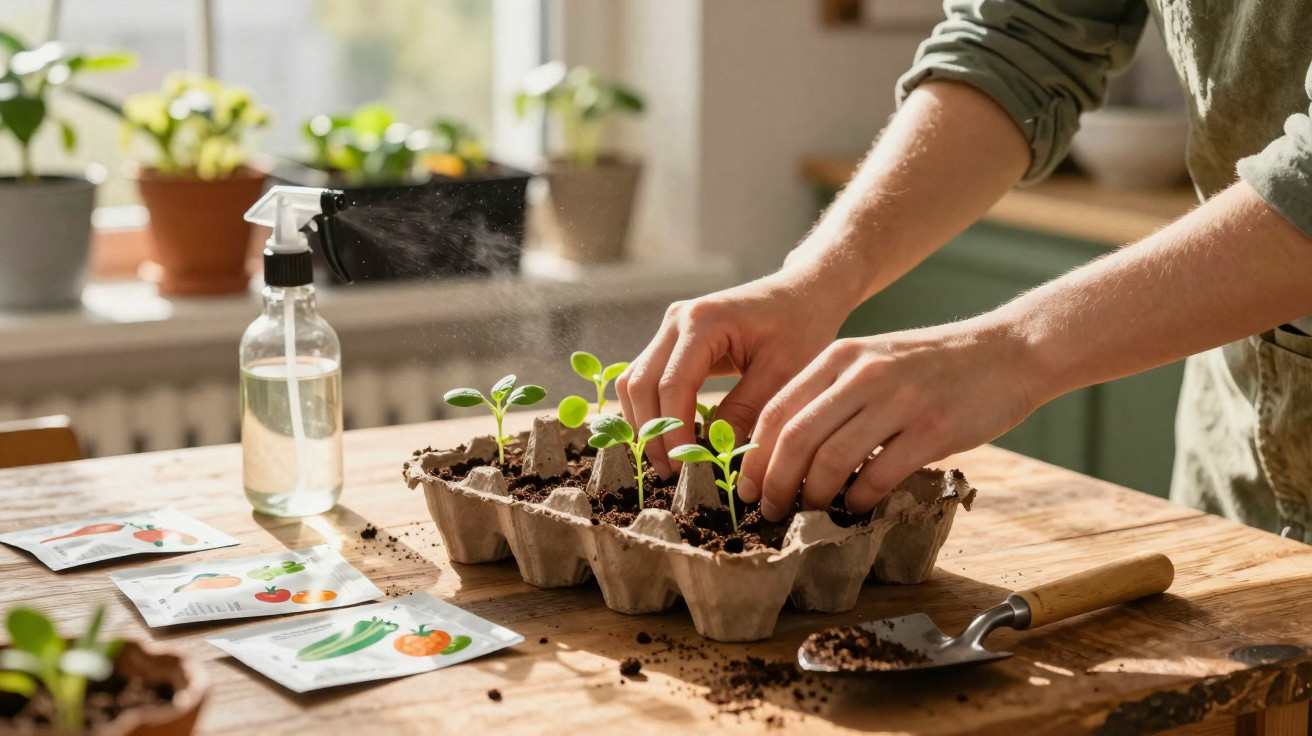
When the light returns, the temptation to get a potager under way early can be impossible to resist. Most kitchens contain a simple solution: egg cartons. They are cardboard, compartmentalised, readily available and almost free. The key is not merely to use them, but to use them well.
I first came across the idea in a neighbour’s flat during a wet March afternoon. The kitchen carried a slight scent of coffee and damp cardboard, while a line of egg cartons rested on the windowsill like small grey boats. Every compartment contained its own miniature scene: a little compost, a pinpoint of green growth and a label cut from a cereal packet. There was nothing elaborate: no modular trays, heated mat or humming grow lights.
The arrangement had a quiet assurance about it, a sense of hope held beneath the windowpane. Seeds have modest requirements: air, moisture, warmth and room to grow. In a frugal, almost poetic fashion, egg cartons provide all of these. The important thing is understanding where simplicity ends and neglect begins.
Why egg cartons are a clever seed-starting method
Cardboard egg cartons are designed to protect delicate items and absorb excess moisture, which makes them useful for germination. Their separate cells keep seedlings apart, prevent roots from becoming tangled and limit the amount of compost used, so a whole bag is not wasted on a handful of seeds.
They also draw up water gradually, helping to avoid waterlogged patches. This gentle breathability is valuable on a sunny windowsill. Damp on the outside, open at the centre and warm above, they create a suitable first home for tomatoes, chillies, lettuce, basil and even cabbage. They are tiny pots requiring tiny investments, but they can deliver proper results.
I saw someone sow 18 lettuce seeds across six carton cells for under £1 altogether. It really was that simple: a spoonful of peat-free seed compost, water poured from a mug and cling film secured over the top with clothes pegs. After five days, tiny green flecks had emerged. By day 12, small yet robust cotyledons were reaching towards the pale daylight.
Using kitchen scissors, they cut out the individual cups and moved each one, carton included, into a larger module. In the new pot, the cardboard softened, the roots grew through it and the plants showed no sign of distress. It felt like a tiny greenhouse built from breakfast. I came away thinking that this could be managed in any flat, at any time, on any budget.
There is sound reasoning behind the appeal, too. Paper allows air through. Seed compost should remain moist rather than saturated, as oxygen must reach both the seed and, later, the emerging roots. Plastic trays may hold too much dampness and, if conditions are unlucky, encourage damping-off. Once pierced and watered from below, egg cartons work as wicks, drawing up the moisture required while allowing excess to evaporate.
Thermal mass plays a part as well. A carton placed on a room-temperature tray retains warmth more effectively than one sitting on a bare cold saucer. Most everyday vegetables grow well at 18–22°C. Tomatoes usually germinate in 5–10 days, peppers in 10–21 days and lettuce in 3–7 days. Give seeds a microclimate with a clear cover, some ventilation and a breathable container, and those timings become more reliable, reducing waste.
There is a sustainability benefit, too. Reusing what is already available sends less material to waste and cuts plastic use without any moral grandstanding. Small habits compound in a potager, and this one is genuinely accessible. If you can afford seeds and a bag of compost, you can take part.
Using egg cartons to raise sturdy seedlings
Choose an uncoated cardboard egg carton rather than a glossy, polystyrene or plastic version. Remove the lid, keeping it to use as a drip tray. With a skewer, make two or three small drainage holes in every cup, then add a light layer of compost to cover the holes.
Fill the sections with seed-starting compost that has been moistened in advance, so it holds together gently when pressed. Plant one or two seeds in each cell at roughly twice the seed’s own depth. Mark every row with a small strip of card. Mist the surface, then place the carton in a shallow tray containing a few millimetres of water to water from below.
Create a mini propagator by loosely covering it with clear food wrap or a freezer bag cut to size, but leave a small opening for ventilation. Put it somewhere warm and bright, away from direct midday sunshine. Let’s be honest: nobody actually does that every single day. Things get busy, so establish a manageable routine: inspect the seeds in the morning and evening, and refill the tray whenever the carton feels light.
“Treat seeds like guests you’ve invited: give them a seat, some air, a drink, and space to leave when they’re ready.”
- Water from the bottom to avoid splashing stems and encouraging mould.
- Open the cover slightly as soon as green shoots appear, then take it off completely two days later.
- Turn the carton every day so seedlings do not lean sharply towards the light.
- Thin each cell to one seedling using scissors; snip unwanted seedlings instead of pulling them out.
- Gently run your hand over the seedlings to imitate a breeze and strengthen their stems.
The main mistake is overwatering. Cardboard does wick moisture, but a tray that stays saturated becomes a party for fungi. Keep the water level shallow and wait for the carton to become lighter before topping it up. Should the compost surface turn green, scrape the growth away and add a small dusting of cinnamon, an old gardening remedy that can quietly help.
Light is the next potential difficulty. Even a bright south-facing window may provide insufficient light in late winter. Move the carton nearer the glass or use a small LED grow bulb for 12–14 hours. We have all experienced seedlings suddenly stretching like giraffes overnight, then acted as if it was intentional.
Timing matters as much as anything else. Do not sow every seed at once simply because you have found more eggs. Make sowings weekly so you can pot plants on without feeling overwhelmed. Keep the first wave small, learn your windowsill, and scale up with what survives. Consistent small successes are always better than major regrets.
Transplanting egg-carton seedlings and hardening them off
Once the roots form a light network through the cup and the first true leaves have appeared, it is time to move the plants. There are two options. You can cut out each cup and plant it intact in a larger module or bed. Tear a slit along one side to help roots emerge, and bury the rim so it cannot draw moisture away from the soil surface.
Alternatively, if the cup needs to remain whole for a little longer, transfer it into a 9 cm pot filled with fresh compost. Tomatoes can be planted more deeply to encourage additional roots along the stem. Basil prefers close quarters, whereas lettuce copes well with early transplanting. Harden seedlings off over a week: begin with a couple of hours outdoors in shade, then gradually increase both the time outside and their light exposure.
Some indoor airflow is helpful. Running a gentle fan for an hour each day lessens the risk of damping-off and produces firmer stems. If a cup gets mushy, don’t panic - that’s just the paper returning to the soil. Tear it, plant it and allow the roots to continue growing. This is low-fi gardening that works with the timetable you actually have.
How this egg-carton hack helps a budget potager
Raising plants from seed depends less on equipment than on doing the same small tasks repeatedly. The egg-carton approach lowers the barrier to entry, making it more likely that you will start at all, and that changes everything. You can experiment earlier, spend less when something fails and build confidence sooner. Give a spare carton to a neighbour, exchange seeds for another variety or compare photographs a week later. Momentum builds.
The method encourages routines suited to ordinary life: small batches, basic labels, quick inspections and a neat amount of space on the sill. It changes the potager from a future ambition into a habit for today. While shops sell fresh trays each spring, a breakfast carton can quietly become a nursery. That is not nostalgia; it is simply practical.
What starts as a “why not” can soon become an understated system. The cardboard remains breathable, the compost retains its balance, seedlings grow more firmly and costs stay low. Pass the idea on to someone starting out. The finest potagers often start with a carton and a cup of tea.
| Key point | Detail | Benefit for the reader |
|---|---|---|
| Choose cardboard and provide drainage | Make 2–3 holes in each cup; avoid plastic and polystyrene cartons | Prevents waterlogging and damping-off |
| Water from below and ventilate | Use shallow tray water, a loose cover and remove it after germination | Maintains steady moisture without soaking stems |
| Transplant the complete cup | Cut it out, slit the side, bury the rim and harden off for 7 days | Reduces transplant stress and produces stronger seedlings |









Comments
No comments yet. Be the first to comment!
Leave a Comment