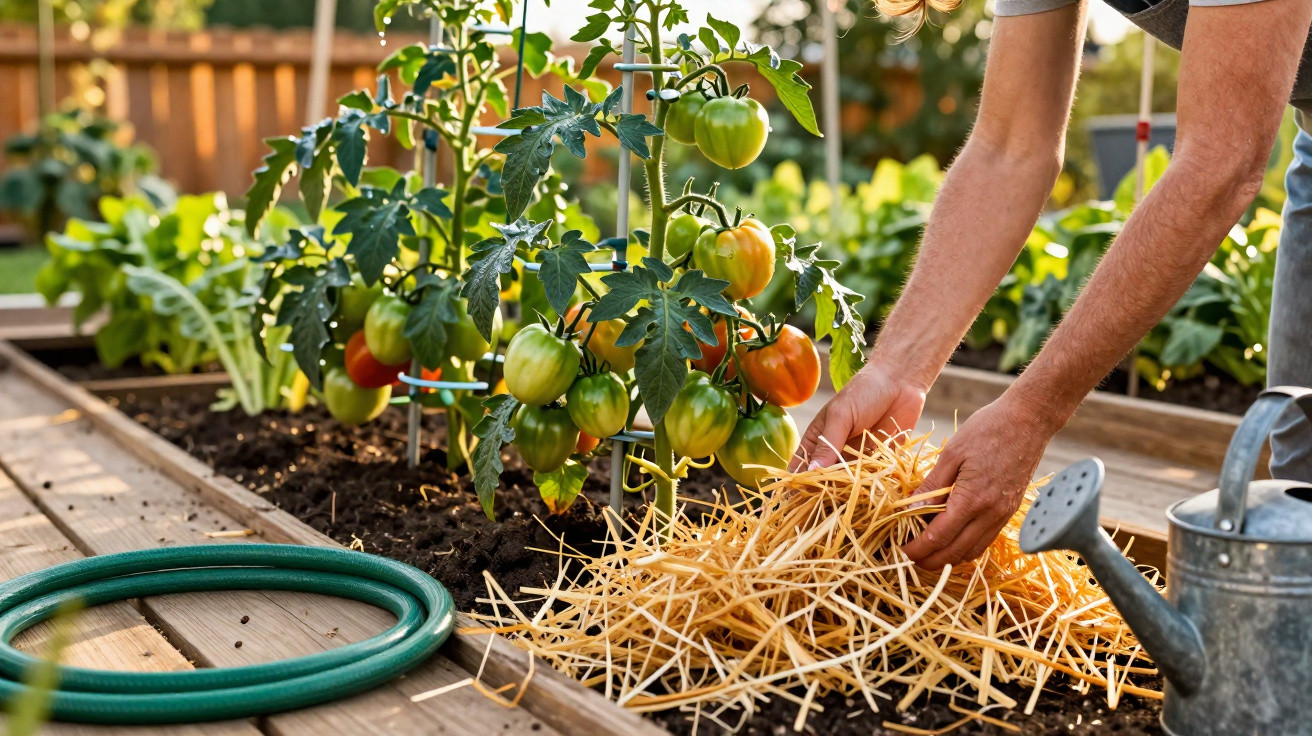
If you grow tomatoes in the garden or on a balcony, you will probably reach for the watering can almost every day in summer. Yet fruits still split, leaves turn yellow and fungal diseases take hold. Surprisingly often, the problem is not the amount of water, but how and when the soil is watered – and whether it was properly prepared beforehand.
Why tomatoes become ill despite regular watering
Tomatoes are highly sensitive to changes in their water supply. Too little water at one point followed by far too much later puts the plants under considerable stress.
“Irregular watering quickly leads to cracked fruits, weak plants and increased disease pressure.”
Garden experts point to several typical warning signs:
- Cracked fruits: The skin splits, allowing pathogens to enter easily.
- Yellow, dry leaves: A clear indication of insufficient water.
- Limp, mushy stems: These suggest waterlogging around the roots.
- Frequent fungal infections: For example, blight following the first rainy days.
Many people try to solve the issue by watering even more. In many cases, this only makes matters worse. Tomato roots do not tolerate either permanently wet conditions or bone-dry soil; they need consistently moist ground.
Watering tomatoes correctly: not from above and not all the time
Specialists advise watering tomatoes directly around the root zone – less frequently if necessary, but thoroughly. This lets water penetrate deep into the soil and reach the fine roots.
“The ideal approach is to water infrequently, slowly and deeply – directing the water to the roots rather than the leaves.”
These points matter most:
- Water at the base: Apply water directly beside the stem, rather than over the leaves and fruits.
- Water slowly: Allow enough time for the water to soak in instead of running off across the surface.
- Water less often but generously: Give the plants a thorough soaking rather than frequent small amounts.
- Avoid overhead watering: Wet leaves encourage fungal diseases and increase evaporation.
If possible, use a drip hose or a simple perforated bottle placed in the soil, so that water reaches the roots directly. However, the real game-changer happens earlier: before the watering season gets properly under way.
The key task before the watering season: mulching tomatoes properly
The frequently overlooked step is to mulch at the right time. A protective layer over the soil slows water evaporation and prevents major fluctuations in soil conditions.
“With a layer of mulch, tomatoes often grow more vigorously and look noticeably healthier because the soil remains evenly moist.”
Without protection, the top few centimetres of soil dry out quickly. The roots are then exposed to a hot, unstable zone. Mulch acts as natural insulation and offers several benefits:
- More even moisture: The soil retains water for longer.
- Temperature regulation: The ground does not heat up as much or cool down as sharply.
- Fewer weeds: There is less competition for water and nutrients.
- Gentler conditions for the soil: The surface does not form a crust as readily, while rain and watering do not strike it directly.
When to apply the mulch layer
Garden professionals recommend putting down the first mulch layer in spring once the soil has warmed up – usually in March or April. After planting out in May, add mulch around the tomato plants.
Important rules include:
- Never mulch bone-dry soil: Water thoroughly first, then apply mulch so the existing moisture remains in the ground.
- Use a mulch layer 5 to 10 centimetres deep: A layer that is too thin has little effect, while one that is too thick may rot if it remains constantly wet.
- Leave some space around the stem: Do not press mulch directly against the stem, as this can cause rot.
Suitable materials for tomato mulch
Different materials can work well, depending on the garden and what is available. Common options include:
| Material | Benefits | Notes |
|---|---|---|
| Straw | Light, well ventilated and protective in intense heat | Do not tread it down too firmly, otherwise moisture can build up |
| Shredded leaves | Free and improve soil structure over time | Shred or tear them up first so they do not clump together |
| Mature compost | Holds water and provides nutrients | Do not spread it too thickly, as this can result in an excess of nutrients |
Combinations are often the most practical option: for instance, apply a thin layer of compost directly to the soil, then cover it with straw or shredded leaves.
How to water tomatoes when they are mulched
Mulch also changes the watering routine. Although the surface may look dry, the soil beneath it can still contain plenty of moisture.
“Before each watering session, reach beneath the mulch and check the soil – a finger in the soil is better than any calendar.”
In practice, this means:
- Carefully move the mulch slightly aside around the stem using your hand.
- Push a finger two to three centimetres into the soil.
- If it still feels cool and slightly moist, the watering can can wait.
- If the soil is crumbly and dry, water slowly at the base so that the water soaks in beneath the mulch.
Then pull the mulch back towards the stem, while leaving a small air gap. This creates a protected area: moist but not wet, airy but not dried out.
Common tomato mulching mistakes – and how to avoid them
The method is straightforward, but mistakes can still creep in easily. Three recurring pitfalls are particularly common:
- Mulching too early: If the soil is still cold, the layer slows its warming. It is better to wait until spring has properly arrived.
- Only watering over the top: Anyone who simply sprays the mulch once a week risks wetting only the top layer while the soil beneath remains dry.
- Pressing mulch against wet stems: This can encourage rot and fungi. Leaving a small gap around the stem protects the plant.
Why mulch really makes tomatoes “healthier”
The term “healthier” may initially sound vague, but it is easy to explain in the case of tomatoes. More consistent soil moisture means fewer cracks in the fruits, while the plant has to cope with less stress. Stressed tomatoes are much more vulnerable to diseases and pests.
Mulch also reduces the risk of fungal spores splashing up from the soil onto the leaves during watering or rainfall. The protective layer acts as a buffer between the ground and the plant. In years with a wet summer, this can make the difference between a reasonably stable harvest and a total loss.
A practical example from everyday gardening
A typical scenario is this: a hobby gardener plants tomatoes in a bed in May, waters diligently and then notices brown patches and splitting fruits in July. The following year, they spread a 5–7 centimetre layer of straw mulch with a little compost from April onwards, check soil moisture regularly with a finger and water only when the soil is genuinely dry. The result is stronger plants, fewer fungal infections and much more evenly developed fruits.
This approach offers noticeable benefits, especially on light, sandy soils because they hold water poorly. On heavy, very clay-rich soils, mulch is worthwhile in combination with long-term soil improvement using compost, so that waterlogging does not develop.
Combining mulch with other care measures effectively
Preparing the soil before the watering season is not a replacement for other care measures, but an addition to them. Useful steps include:
- Sturdy canes or strings to prevent plants from lying in the wet area close to the ground.
- A rain cover or tomato house to keep leaves as dry as possible.
- Targeted fertilising in spring and again in summer, adapted to the soil.
Combined with a well-planned watering strategy, a simple bed can quickly become a remarkably resilient tomato planting. Once you get into the habit of checking beneath the mulch before watering, you soon notice how much water can be saved – and how noticeably the quality of the harvest changes.














Comments
No comments yet. Be the first to comment!
Leave a Comment