The first time you properly notice your grout is often completely accidental. You might be wiping up a spill when the light catches the floor at exactly the wrong angle, revealing pale tile lines that now look… grey. Perhaps yellow. Or a peculiar, weary beige that seems to say, “I’ve seen things.” You try washing-up liquid, followed by whichever all-purpose spray is nearby, but nothing shifts. Before long, you are wondering precisely when your bathroom became a before photograph. Then, over coffee, a friend casually delivers the news: “Oh, I just mix three things from my pantry and wipe it all on. Fifteen minutes later it looks new.” You look at their shining kitchen tiles, then your own blotchy grout, and feel slightly let down.
Some advice sounds like clickbait-until you watch it actually work.
Why grout looks grimy however often you clean
Grout is essentially a sponge that never volunteered for the role. Tiles are smooth and simple to wipe, but the fine, sand-filled gaps between them steadily absorb everything: soap scum, cooking grease, muddy shoe marks, coffee spills and hard-water deposits. On the first day, the lines are crisp, clean white. Six months later, they become a patchy watercolour record of everyday life. Because the discolouration builds gradually, you barely notice it. Then you move a mat or bin and discover the original grout colour-almost luminous-beside the dull surrounding area. The contrast lands like a miniature domestic horror film.
I saw exactly this in a friend’s rented kitchen last year. She insisted the floor was “just old”, until we moved her recycling bin and found a flawless rectangle of bright grout beneath it. No footsteps, splashes or crumbs had ever reached that patch. By comparison, the rest of the floor looked nearly brown. She had been mopping twice weekly, and sometimes more often after her children brought in mud, while faithfully using a reduced-price “deep-clean” product. None of it addressed the real issue: years of dirt embedded in the pores. All that mopping suddenly seemed like an unfunny joke.
There is a straightforward reason it happens repeatedly. Most everyday cleaning products are formulated for non-porous, smooth finishes rather than absorbent grout. They pass over the grout, perfume the room and leave that fresh-clean sensation, but evaporate without loosening what is trapped within. Steam can help somewhat, as can hard scrubbing, yet dirt has chemistry working in its favour. Oils adhere, minerals set hard and soap scum clings on. What you need is something capable of dissolving, lifting and lightly abrading at the same time. That is why a basic three-ingredient cupboard mixture can seem so remarkable when it beats the expensive bottles beneath the sink.
The 3-ingredient grout mix that is driving cleaners crazy
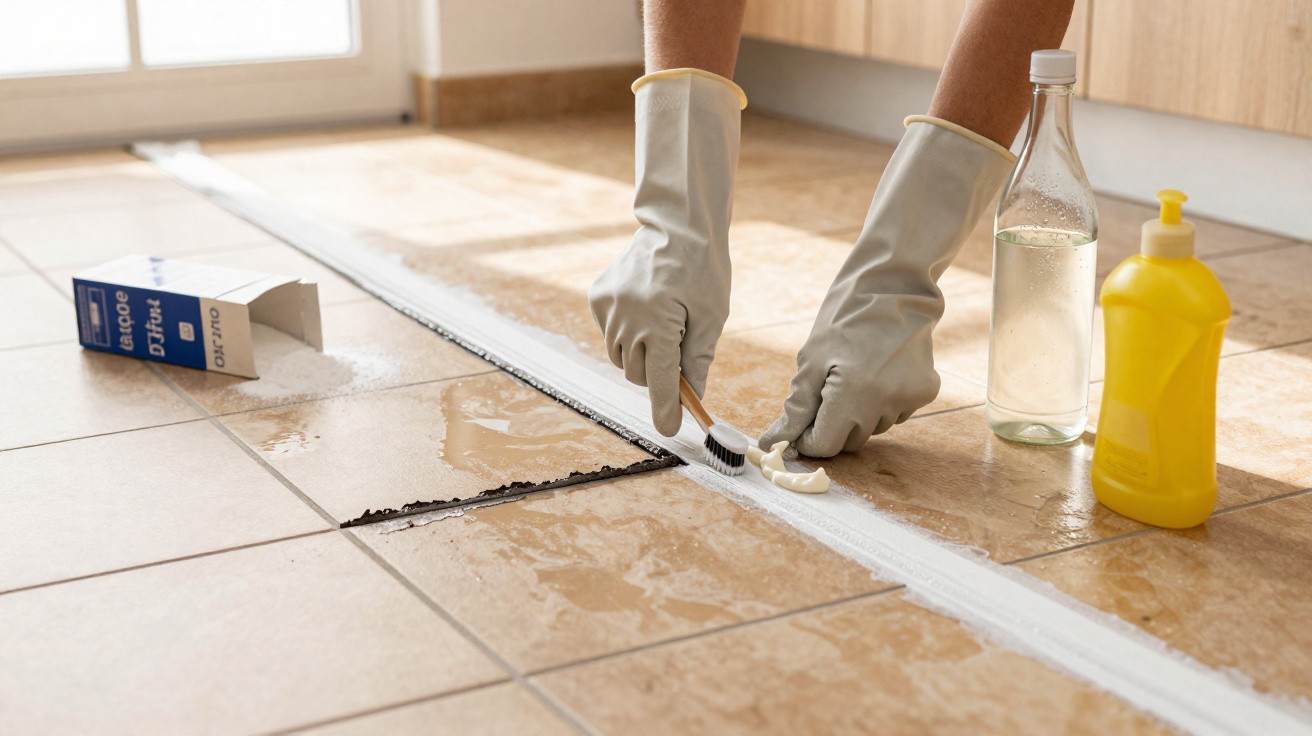
The formula that repeatedly goes viral is almost absurdly straightforward: baking soda, white vinegar and washing-up liquid. Nothing else is required-no obscure powders, industrial-smelling fumes or ten-stage routine that consumes your Saturday. Scatter baking soda straight along the grout lines, add a little washing-up liquid, then pour or spray diluted white vinegar over it. It fizzes like a school science-fair volcano, which is when the process begins. Leave it for around 10–15 minutes, then scrub with a firm brush or an old toothbrush. Wipe with a damp cloth, rinse, and take a step back. The change can be startling, particularly with light-coloured grout.
The main error with this mixture is either being too hasty or using far too much. People pile on excessive amounts, scrub as if buffing a car bonnet, wear themselves out and then pronounce it “overrated”. Instead, let the chemistry carry most of the workload. Apply a light, consistent layer of baking soda to the grout. Add a few dots of washing-up liquid along the same route. Use a spray bottle containing vinegar diluted with water, applying only enough to soak the area and produce a soft foam. Then leave it alone. Have a coffee, look at your phone or reply to an email. The wait may feel almost too easy, which is precisely the point.
One professional cleaner I spoke with laughed and said, “Honestly, this mix is unfair competition. People try it once and suddenly think they don’t need me anymore.” She was joking, mostly, but there was a hint of truth there. When a two-euro bottle of vinegar, a box of baking soda, and your regular dish soap outshine brand-name grout sprays, you start questioning a lot of things under your sink.
- Ingredient 1: Baking soda – A mild abrasive that lifts surface dirt without scratching most tiles.
- Ingredient 2: White vinegar – Breaks down mineral deposits and soap scum, while activating the baking soda.
- Ingredient 3: Washing-up liquid – Cuts through oily residue and helps the mixture spread evenly.
What really happens during those 15 minutes
At first glance, it appears to be no more than bubbles and foam. Beneath the surface, though, the three ingredients tackle built-up grime in separate ways. Baking soda settles into porous grout and works against the dirt like gentle sandpaper. Vinegar reacts with it, helping to loosen minerals and break down soap scum. Washing-up liquid surrounds greasy particles, allowing them to lift and rinse away rather than sticking back on as the floor dries. This is not about brute force; it is quiet, gradual cooperation. That’s why those 10–15 minutes of waiting feel almost suspiciously effective.
This also explains why one person says it “does nothing” while another claims it changed their life. When grout has accumulated deep staining over years, a single 15-minute treatment will not reverse all of it. You may need to repeat the method over several days, or work through a small area at a time rather than attempting the entire kitchen at once. Realistically, nobody does this every day. However, treating a square metre near the sink and comparing the before-and-after result in identical light makes the benefit clear-and can leave you deciding which area to “treat” next.
The emotional effect can be surprisingly powerful. People describe refreshed grout as though they have redecorated the entire room. Floors seem lighter, while a bathroom can look newer even when its tiles are twenty years old. Some people are even mildly annoyed by the money spent on sprays and gels that never reached the ingrained dirt. We have all had that moment: realising that a simple trick your grandmother may have used outperforms a fluorescent bottle covered in six logos and a celebrity endorsement. There is no need to become fixated on grout. Yet once you have seen what three cupboard staples can achieve in fifteen minutes, it is difficult to overlook it again.
How this simple grout trick changes everyday cleaning
Trying this mixture once is gratifying. Making it a small routine can alter how you view rooms that seem “old”. Perhaps the shower is this Sunday’s job, and the hallway comes next week. You could keep a small jar of pre-mixed baking soda and a labelled spray bottle of vinegar solution beneath the sink, making preparation take only seconds. Some people even choose a long-handled grout brush so they do not have to kneel down. The aim is not perfection, but the quietly satisfying knowledge that you can refresh those lines whenever they begin to look tired.
Cleaners with years in the profession understand this: the most dramatic results often come from the least glamorous products. They are not threatened by this cupboard method; they simply find the surprise it creates amusing. One cleaner told me that she now demonstrates a “test line” of grout before giving a large quotation. If the home responds well to the baking soda–vinegar–washing-up liquid combination, clients sometimes choose to complete the rest themselves and employ her for jobs that genuinely need professional equipment. It is a subtle shift in balance. You learn where help is truly necessary, and where five minutes of preparation using ingredients from your cupboard will do.
There is something unexpectedly reassuring about it, too. There is no harsh, choking odour, no plastic-heavy shopping trip and no impression that a branded miracle product is needed to keep a respectable home. All it takes is a little powder, a splash of inexpensive vinegar and a squirt of the soap you already use on your hands. It is a reminder that much of cleaning comes down to contact time, simple chemistry and noticing the small corners that are so often ignored. It will not repair cracked grout or broken tiles. It will not remove every stain on the first attempt. But it gives you back a bit of control in a space that’s supposed to feel like yours.
| Key point | Detail | Value for the reader |
|---|---|---|
| Simple 3-ingredient mix | Baking soda, white vinegar, washing-up liquid | Relies on inexpensive cupboard staples rather than specialist products |
| 15-minute contact time | Leave the mixture in place before scrubbing | Improves the effect with little effort and saves physical energy |
| Targeted, not constant, use | Treat individual sections or high-traffic areas | A realistic routine for busy lives that still produces visible results |













Comments
No comments yet. Be the first to comment!
Leave a Comment