Many people throw it away – completely unnecessarily, because one simple trick can make it an eye-catcher again.
Countless kitchens have a tired-looking chopping board sitting on the worktop, covered in deep grooves, dark marks and dull wood. The immediate reaction is often to put it in the bin and buy a replacement. Usually, though, that comes down to uncertainty, especially over hygiene and durability. In reality, a solid wooden board can often be restored in a short time until it looks almost new – without specialist products and without spending a penny.
Why a worn wooden chopping board does not belong in the bin
Solid wood is remarkably forgiving. Whether it is beech, oak, walnut or ash, its surface can be renewed time and again. What initially appears to be “damaged” is generally no more than wear in the top fractions of a millimetre.
Anyone who throws away a solid chopping board is often parting with a durable, high-quality item that could continue to be used for years with a little care.
Professionals in woodworking and restaurant kitchens have always worked this way. Rather than constantly buying new equipment, they refresh their boards regularly. Households can do exactly the same using the simplest of materials. The key benefits are clear: it saves money, conserves resources and keeps a sturdy, familiar kitchen tool in use instead of replacing it again after only a few months.
When a chopping board can be saved – and when it cannot
Before attempting to restore it, inspect the board critically. Not every board should return to the kitchen, particularly where hygiene is concerned.
These signs on a wooden board are not a problem
- Numerous scratches and knife marks on the surface
- A grey, dull appearance
- Mild staining from vegetables, spices or fruit
- A slightly rough feel, with the wood seeming dry
These issues can normally be remedied very effectively, as they affect only the uppermost layer of the wood.
In these cases, you should discard the board
- Deep cracks where dirt can become trapped
- Black, soft patches that suggest mould
- A persistent musty or rotten smell that remains despite thorough cleaning
- A noticeably warped board that rocks badly
Wood with deep damage can pose a risk of bacterial contamination and cannot truly be made safe again simply by sanding it. In these cases, the board should no longer come into contact with food – at most, it can be used as decoration or as a coaster.
The zero-cost trick: sanding and oiling with household supplies
Once it is clear that the chopping board can still be saved, the real trick begins. Tools that many people already have in the shed or toolbox can be used to refresh the entire surface.
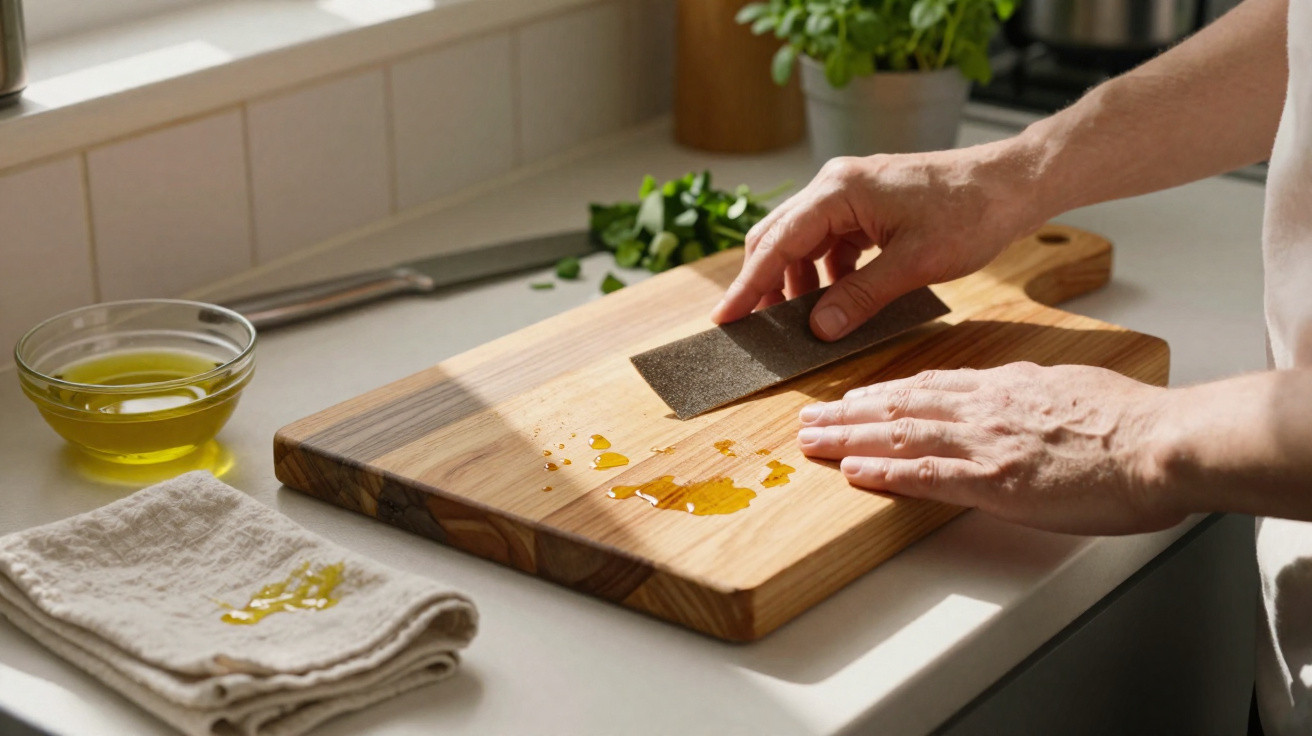
Step 1: Sand down the surface
To get started, a piece of sandpaper with a grit between 180 and 240 is enough. It may not look like much, but it can turn a heavily scored work surface into an even-looking piece of wood.
- Place the dry board on a non-slip surface.
- Sand in the direction of the wood grain, not across it.
- Apply moderate pressure and continue until the deepest grooves are noticeably flatter.
- Lightly sand the edges as well, so that splinters do not form there.
- Finally, thoroughly wipe away the sanding dust with a slightly damp cloth.
After only a few minutes, the surface will look lighter, feel smoother and appear much more hygienic. Anyone who prefers an especially smooth finish can follow up with even finer sandpaper.
Step 2: Apply a nourishing layer of oil
Once it has been sanded, the wood needs nourishment. In many homes, the right product is already in the cupboard. There is no need for an expensive specialist treatment:
- Sunflower or rapeseed cooking oil
- Food-safe linseed oil
The requirement is that the oil is fresh and has a neutral smell. Rancid oil is best kept out of the kitchen, not put on the board.
Proceed as follows:
- Lay the completely dry board flat.
- Put a few drops of oil in the centre.
- Use a lint-free cloth to spread it thinly over the entire surface – including the front, back and edges.
- Leave it to soak in for at least one hour, or preferably overnight.
- Carefully remove any excess oil with a clean cloth.
Once it has been oiled, the wood looks warm and vibrant again, water beads off more effectively, and stains do not penetrate as deeply.
You can repeat this process every one to three months, depending on how heavily the board is used. As soon as the surface begins to look dull again or absorbs water quickly, it is time for another coat of oil.
Everyday rules to help the board last for years
Once the chopping board has been refreshed, everyday handling determines how long it stays attractive and hygienic. A few straightforward habits can greatly extend its lifespan.
What damages your wooden board
- Dishwasher: High temperatures and powerful water jets make the wood swell and crack.
- Prolonged contact with water: If the board is left in the sink, it can warp and, in the worst case, develop mould.
- Constantly damp areas: If you repeatedly chop in the same spot and moisture gets into the wood, depressions can form.
What keeps your wooden board in good condition
- Clean it straight after cooking with hot water and a little washing-up liquid.
- Dry it immediately and stand it upright to finish drying.
- For raw meat, use a less heavily scratched area or a separate board.
- If the surface becomes rough, lightly sand it with fine sandpaper.
- Oil it regularly before the wood turns grey and brittle.
Hygiene: how safe are wooden chopping boards really?
Persistent myths surround chopping boards, and many people automatically choose plastic because they fear germs. However, several studies show that wood is not less hygienic and can even offer advantages when handled correctly.
The reason is that wood can absorb moisture before releasing it again later. During this process, many bacteria die off naturally, whereas they can often remain for longer in the deep grooves of plastic boards. The crucial point is that the wood must be allowed to dry thoroughly after use and must not have deep, neglected cracks.
Anyone who regularly cleans, dries, lightly sands and oils their chopping board creates a robust surface that performs very well against plastic in everyday use.
A clear separation is sensible: use one board for meat and fish, and another for vegetables, fruit and bread. This helps prevent cross-contamination, regardless of the material.
Practical kitchen examples
Many households have several wooden boards lying around, and one is usually far more worn than the others. Instead of throwing it away, it can be deliberately given a new purpose:
| Board condition | Suitable use |
|---|---|
| Lightly scratched, otherwise intact | Continue using it as an everyday board after sanding and oiling |
| Heavily marked, without cracks | Reserve it for bread, vegetables or fruit after restoration |
| Small knocks around the edges | Use it as a serving board for cheese, antipasti or snacks |
| Badly warped, with no food contact | Use it as decoration, a coaster or a storage surface |
Risks many people overlook – and how to avoid them
Despite the appeal of the zero-cost trick, there are a few points to keep in mind. In particular, mineral oils from DIY shops or care oils that are not labelled for food use are unsuitable for food-contact surfaces. They may contain substances that have no place on the dining table.
Oil layers that are applied too thickly are also problematic: they remain sticky, attract dust and may develop an unpleasant smell over time. Applying thin coats and repeating the process is the better approach. Also, sanding dust belongs in household waste, not on the compost heap or down the sink.
Why the effort is genuinely worthwhile
Anyone who restores a wooden board quickly discovers how satisfying this small piece of kitchen maintenance can be. What seemed to be a “used-up” object becomes a valuable tool again, making cooking more enjoyable. There is also the financial benefit: with proper care, a high-quality board can last for many years, and ideally for decades.
At the same time, treating everyday objects this way sharpens your eye for quality. Instead of buying something new at the first imperfection, repair and care become the priority. And it starts with a small piece of sandpaper, a few drops of oil – and the decision to give an old wooden chopping board another chance.





Comments
No comments yet. Be the first to comment!
Leave a Comment