Knead the dough, set out the bowl, activate the yeast – then what? It is at this point that most mistakes occur. They happen neither during mixing nor in the oven, but while the dough is resting. What matters is how the dough is “treated” over the following minutes or hours. One straightforward step determines whether it rises light and airy or ends up dull and dry.
Why the resting period determines success or failure
Anyone who bakes regularly will know the pattern: some doughs become wonderfully fluffy, while others stay dense, split or develop a tough skin. The recipe is rarely the culprit; in most cases, it comes down to managing moisture.
Moisture is the key to a supple crumb
As dough rests, the yeast gets to work. It produces gas, the dough expands and the gluten structure strengthens. Yet an uncovered surface also begins to dry out. Water within the dough moves towards the outside and evaporates.
“Protecting the moisture at the dough’s surface prevents a hard crust and creates an evenly soft texture – from the edge to the centre.”
Without that protection, a fine skin forms and gradually becomes thicker. It may feel leathery or crumbly, makes the dough difficult to roll out and can even affect its oven spring. Instead of rising freely upwards, the dough may spread sideways or rise unevenly.
Doughs that are especially sensitive
The more water or fat a dough contains, the more susceptible it is to drying out. The following are particularly vulnerable:
- yeast dough for brioche, braided loaves or milk rolls
- pizza dough with a long proving time
- shortcrust pastry for tarts or biscuits
- soft bread doughs with high hydration
For these, just half an hour uncovered on the worktop can noticeably alter the surface.
Why cling film is overrated
When dough needs to rest, many home bakers instinctively reach for cling film. It looks professional and appears constantly on cookery programmes, but it is seldom necessary.
What cling film does – and what it can make worse
Cling film certainly retains moisture, but it usually seals the bowl completely. This creates a small humid environment that can become overly wet with warmer doughs. That is counterproductive, especially for pizza dough or doughs intended to become crisp: the top layer can turn sticky, slimy or too soft.
It also brings further drawbacks:
- Single-use waste: every sheet is thrown away after one use.
- Handling: it sticks, tears and tangles, particularly when hands are lightly dusted with flour.
- Temperature: it can easily warp over warm bowls.
For the actual aim – maintaining a lightly humid environment – cling film is simply excessive and, in many kitchens, used purely out of habit.
The unsung hero: a lightly damp tea towel
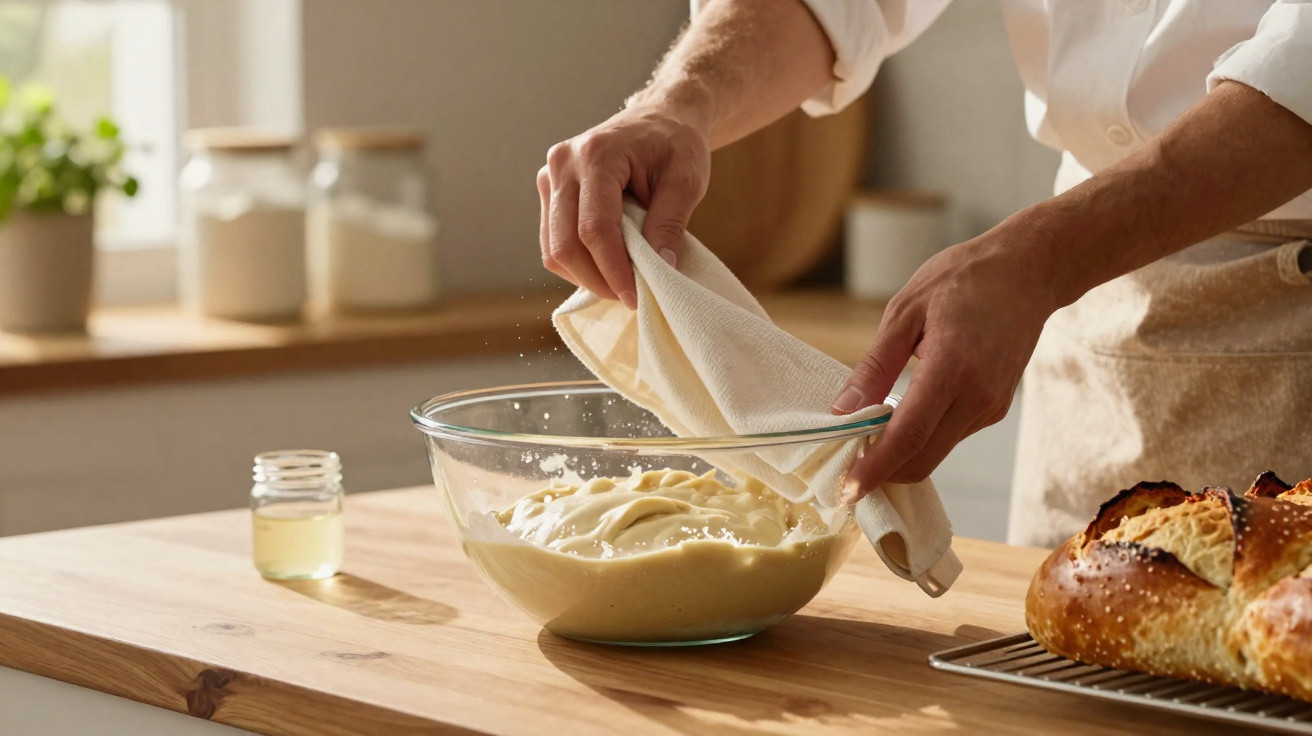
The simplest, most effective and most sustainable answer hangs in almost every kitchen: the traditional tea towel. Slightly dampened, it can replace cling film entirely and will often produce an even better result.
How fabric creates the ideal microclimate
A damp tea towel acts like a breathable lid. It allows a little air to pass through while holding moisture directly above the dough’s surface. This creates a gently humid space where the dough can develop undisturbed.
“The combination of moisture protection and air exchange keeps the surface supple without making it sticky.”
There is no waste, either. Once baking is finished, simply put the towel in the wash and use it again next time.
Step by step: using the tea towel method
- Choose a clean, odour-free tea towel, without a strong fabric-softener scent.
- Dampen it with cold or lukewarm water.
- Wring it out thoroughly so that it does not drip.
- Drape it loosely over the bowl or directly over the dough, without pressing it down.
- For long proving times, check occasionally that the towel remains slightly damp and moisten it again if needed.
This approach is ideal for winter bakes such as braided yeast bread, sultana rolls or king cake, because dry central-heating air can otherwise be particularly hard on the dough.
Alternatives when no tea towel is available
Sometimes you have already kneaded the dough, only to find the laundry basket empty and the final tea towel in use. Even then, you can improvise without reaching for the roll of plastic.
Repurpose everyday kitchen items
Nearly every household has something that can serve as an impromptu cover for dough, such as:
- a suitably sized saucepan lid placed over the bowl
- an upturned dinner plate over the rim of the bowl
- a glass or stainless-steel container left slightly open
- a glass cheese dome placed over the dough ball
The important point is to keep the dough away from draughts and ensure that humidity inside its small “space” stays higher than in the rest of the kitchen.
Small tricks for extra moisture
If the air is exceptionally dry, adding another source of moisture can help. Practical options include:
- placing a small bowl of water directly beside the mixing bowl
- putting the dough into a lightly oiled glass dish and covering it loosely
- lightly dampening a piece of baking parchment and carefully laying it over the dough
This creates a miniature steam bath around the dough. The difference can be considerable on very cold, clear winter days.
What happens when moisture protection is ignored
If dough is simply left exposed, the damage is often only obvious when it is already too late. At first glance, the surface may appear harmless – but its true condition becomes clear during further handling.
Typical warning signs of spoiled dough
The following signs suggest that dough has become too dry:
- a visible skin that cracks when pressed
- splits and fissures across the surface
- dough that can only be rolled out with difficulty
- brioche that lacks its fluffy bite after baking
Many people then try to salvage it by kneading in water, oil or milk. This often weakens the structure: the dough becomes uneven, tough or loses flavour.
An emergency plan for dough that has already dried out
If the damage has already been done, there are still a few rescue attempts worth making:
- lightly mist the surface with cold water
- place the dough beneath a damp tea towel again and leave it for 15–20 minutes
- knead very gently with slightly damp hands
These measures cannot work miracles, but they can make many doughs noticeably more supple and easier to handle again.
Golden rules for perfectly protected dough
Once you become used to this “moisture trick”, you will not want to bake without it. A few simple principles make a difference in everyday baking.
What consistently works when baking
- Always cover dough during every resting period.
- Choose reusable options wherever possible: a tea towel, lid or dome.
- Do not overdo it – too much water makes the surface sticky.
- Use a fingertip check from time to time to see whether the dough still feels elastic.
Anyone who takes these points on board will encounter far fewer baking “surprises” and achieve more consistent results, whether making quick weekday pizza dough or an elaborate Sunday braid.
A simple practical example: winter brioche with the moisture trick
To experience the effect directly, try it with a soft yeast dough. A typical basic recipe for sweet brioche is as follows:
| Ingredient | Quantity |
|---|---|
| Plain flour | 500 g |
| Sugar | 70 g |
| Eggs | 2 |
| Milk (or plant-based milk) | 200 ml, lukewarm |
| Soft butter | 80 g |
| Fresh yeast | 12 g |
| Salt | 1 pinch |
Knead the dough until it is smooth and elastic. Transfer it to a bowl, cover it with a damp tea towel and leave it to prove in a warm place for 1.5 to 2 hours. Shape it afterwards, let it rest beneath the towel once more, then bake. The crumb will be considerably softer and more fibrous than if the surface had been allowed to dry out in the open.
Why this small step is worthwhile
For anyone who bakes frequently, this simple moisture barrier saves not only materials but frustration as well. Failed doughs, tough pizza and dry yeast bakes often result from this single oversight.
The real advantage is that neither specialist equipment nor professional knowledge is required. A lightly damp tea towel, an improvised lid and a little attention during proving are entirely sufficient. The next yeast dough becomes far less of a gamble and much more reliable – with a better bite and more enjoyment at the breakfast or supper table.








Comments
No comments yet. Be the first to comment!
Leave a Comment